The following setup guide is for merchants using NetSuite ERP for their operational activities. In this scenario, Bolt’s NetSuite ERP Bundle passes data directly from Bolt to NetSuite ERP. For other integration scenarios that involve a third-party connector (Celigo, Folio, etc), refer to your connector’s installation guides instead.
WARNING
Bolt supports Checkout for NetSuite ERP, not NetSuite’s SuiteCommerce Advanced plugin.
Before You Start
If you are migrating from a different cart platform, see the Re-platforming section.
Supported Features
How to Install
NOTE
Before beginning installation, reach out to your Customer Success Manager to get set up with another division on your account. You must also add NetSuite’s IP addresses to the Bolt Merchant Dashboard.
Step 1: Add Bundle
- Log into the NetSuite Console.
- Navigate to Customization > Site Bundler > Search & Install Bundles.
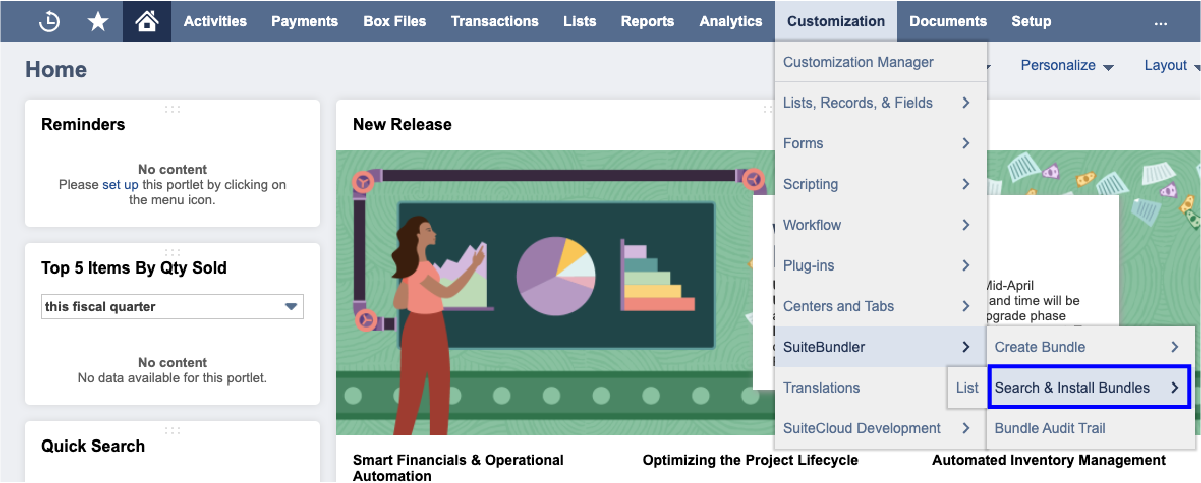
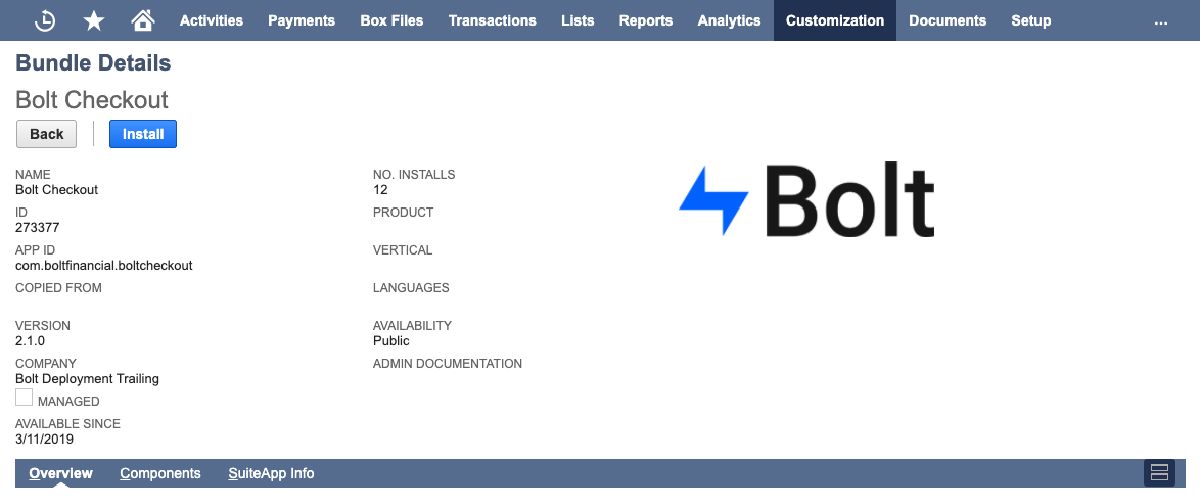
- Search for Bolt Checkout (or the use the Bundle ID
273377).
- Select the bundle.
- Select Install.
Step 2: Configure Bundle
You must create a role record assigned to Bolt for each subsidiary store that is using Bolt Checkout. This role record must include your Bolt API key, found in the Merchant Dashboard.
NOTE
There should only ever be one Bolt Configuration record. If the Bolt credentials need to be updated, the original record should be updated.
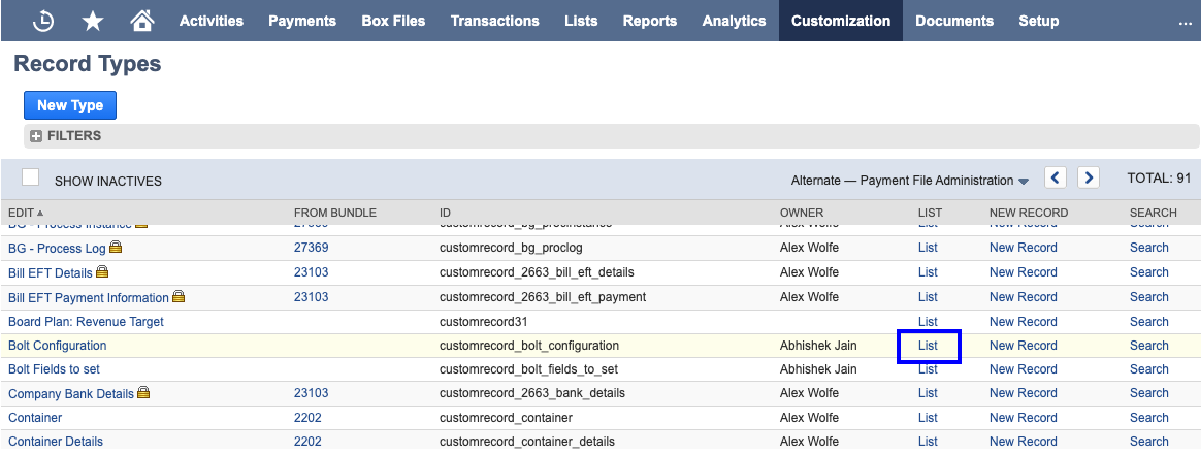
- Navigate to Customization -> List, Records, and Fields -> Record Type.
- Scroll to the Bolt Configuration row.
- Select List.
- Select Edit on the role-type you will assign to Bolt.
- Select the subsidiary that you want to create this configuration for.
2A. For sandbox:
- Select Sandbox Mode.
- In Sandbox API Key, add your Bolt API key found in the Merchant Dashboard. Make sure to use the key for your NetSuite division.
- Add your Sandbox Unindemnified Publishable Key.
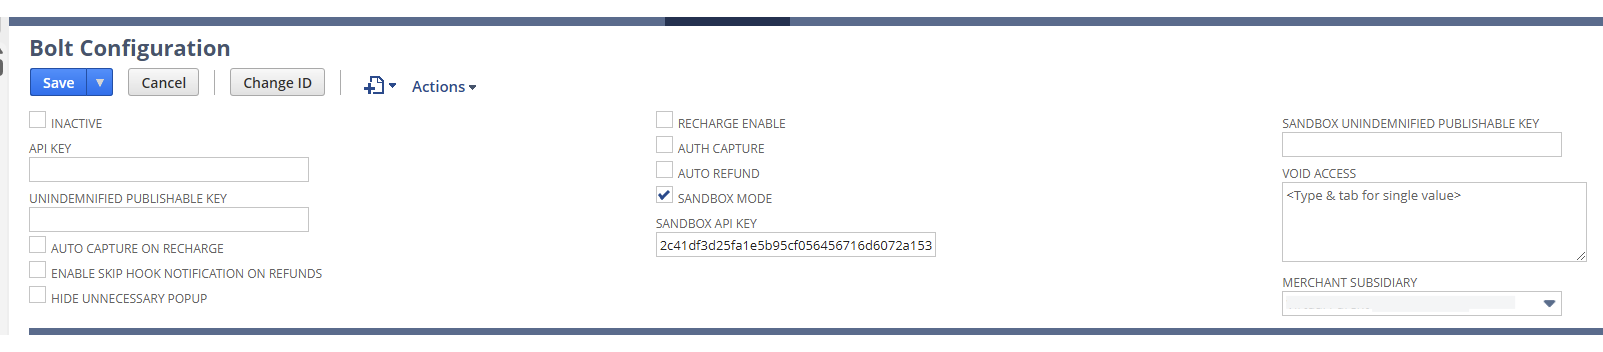
2B. For production:
- In API Key, add your Bolt API key found in the Merchant Dashboard. Make sure to use the key for your NetSuite division.
Step 3: Add Webhook Endpoints in Merchant Dashboard
- Navigate to Customization > Scripting > Script Deployments.
- Find the script with the ID
customdeploy_bolt_webhook_call(Filters > Script > Bolt Webhook Call). - Select View.
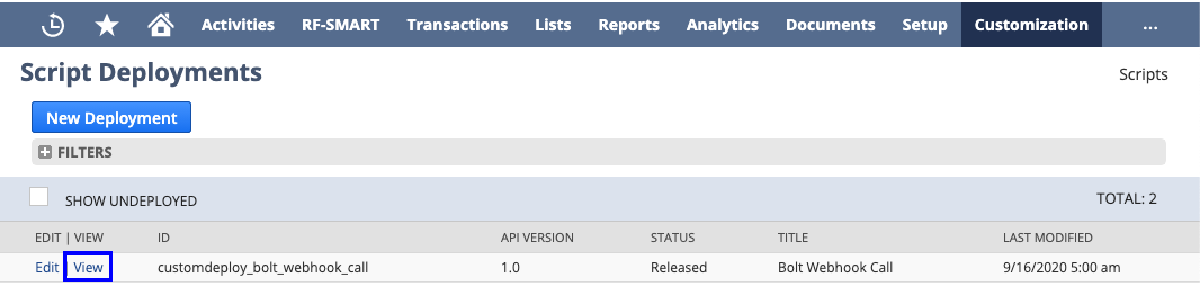
- Copy the Webhook’s External URL.
NOTE
For multiple subsidiaries: appended the webhook URL with &subsidiary=<subsidiary id>.
Subsidiary IDs
- Navigate to the configuration record that you created: Customization > Lists, Records & Fields > Record Types.
- Find the Bolt Configuration row and select List.
- Select on View beside the configuration record that corresponds to the subsidiary that you want.
- Select the merchant’s subsidiary name.
- Find the Internal ID. This is the Subsidiary ID.
4.Add NetSuite IP Addresses to Bolt’s Auto-Approved Domains
- Log in to the Bolt Merchant Dashboard.
- Navigate to Settings > Checkout.
- Scroll to Auto-Approved Domains.
- Select Edit. A dialog box will open.
- Select + Add Domain. A blank text field will appear.
- Type the
domain URLinto the field. - Select Update.
Optional Settings
You can review the following settings using these steps:
- Navigate to the configuration record that you created: Customization > Lists, Records & Fields > Record Types.
- Find the Bolt Configuration row and select List.
| Setting | Enabled | Disabled |
|---|---|---|
| Auth Capture | Immediately authorizes and then captures the payment after entering credit card information into the Bolt Checkout window. | Authorizes the payment only; the transaction is only captured after Billing the order in NetSuite. |
| Sandbox Mode | Directs orders to your Bolt sandbox environment. | Directs orders to your Bolt production environment. |
| Recharge Enable | Enables ability to add items to an existing order that has already been authorized. | Disables ability to add items to an existing order. |
| Auto Capture on Recharge | Immediately captures any additional modifications made to a Sales Order that has already been authorized. Requires Recharge Enable. | Disables capture of additional modifications to the Sales Order until the Sales order has been billed. |
| Enable Skip Hook Notifications on Refunds | Prevents Bolt from sending a webhook that notifies all other divisions that the transaction has been refunded. | Send a webhook to notify other divisions associated with the merchant that the transaction has been refunded. |
Order Flow Customizations
You can define custom flows for sales orders that rely on the transaction status from Bolt using a Bolt Configuration custom record. You can also have some standard/custom fields set by our system, this can be configured in the Bolt Fields to Set sublist on a Bolt Configuration record.
- Log in to NetSuite.
- Navigate to the Custom Settings sub-tab.
- Select Bolt Configuration.
- Check the Use Custom Settings checkbox.
- Populate the field Order Status by selecting
Pending Fulfillmentfrom the list. - To add additional fields:
- Scroll to Bolt Fields to Set sublist
- Enter the
internalid,type, andvalueof the field present on the sales order you wish to update.
- Save.
Example
A custom flow where Bolt’s transaction completed status updates status of the sales order from pending approval to pending fulfillment.
Delayed Capture Use Case
The following use case can be set up by defining a Bolt Fields to Set sublist on a Bolt Configuration file. These optional field mappings enable merchants to suit the following use case:
- An order is created on the shopping cart platform via Bolt Checkout.
- The Order is then populate in NetSuite using a third-party connector.
- The Order gets processed in NetSuite (voided, captured, etc) and handled by Bolt.
To accommodate this, the Bolt Transaction Status (custbody_bolt_transaction_status) and Bolt Transaction Reference (custbody_bolt_reference_number)fields must be passed into NetSuite and mapped to the related fields unique to the eCommerce platform (Magento Commerce, BigCommerce, etc).
| Name | NetSuite Field name | BigCommerce | Magento 1 | Magento 2 | WooCommerce |
|---|---|---|---|---|---|
| Bolt Transaction Reference | custbody_bolt_reference_number | From the OrderNotes field, parse out the transaction ref number Example: Payment Transaction ID GHRC-CMHK-CYRD (This is appended to the end of the order notes field) | transaction_reference | transaction_reference | bolt_transaction_reference_id |
| Bolt Transaction Status | custbody_bolt_transaction_status | If you are doing Manual Capture: hardcode string == 'authorized' If you are doing Auto-Capture: hardcode string == 'completed' BigC does not store the Bolt transaction status. |
transaction_state | transaction_state | If you are doing Manual Capture: hardcode string == 'authorized' If you are doing Auto-Capture: hardcode string == 'completed' WooC does not store the Bolt transaction status. |
Update Bundle
WARNING
You are not able to revert to a previous version after upgrading your Bolt bundle for NetSuite ERP. Ensure you are ready to adopt upgrades before consuming the update.
- Navigate to Customization > SuiteBundler > Search & Install Bundles > List.
- Find the Bolt Checkout Bundle.
- Section Action > Update.
Uninstall Bundle
- Navigate to Customization > SuiteBundler > Search & Install Bundles > List.
- Find the Bolt Checkout Bundle.
- Section Action > Uninstall.
Additional Resources
- NetSuite ERP Order Status Mapping
- NetSuite ERP Orders and Transactions
- Void NetSuite ERP Transactions
- NetSuite ERP Order Refunds
Re-platforming
When re-platforming, you must keep in mind all of the following:
- Use the Merchant Dashboard for order refunds. Do not use a platform-specific backoffice flow that’s connected to a deprecated account division.
- Disable all of your old webhooks for the deprecated account division.